全局安装


1
npm install -g browser-sync

项目中安装


1
npm install --save-dev browser-sync

启动 BrowserSync


1
2
3
4
5
6
7
8
9
//监听一个文件
browser-sync start --server --files "css/*.css"

//监听多个文件
// 如果你的文件层级比较深,您可以考虑使用 **(表示任意目录)匹配,任意目录下任意.css 或 .html文件。
browser-sync start --server --files "**/*.css, **/*.html"

//指定端口
browser-sync start --server --port "3031" --files "**/*.css, **/*.html"

中文官网文档


www.browsersync.cn

评论和共享

规范

在最新的 DOM 规范中,事件的捕获与冒泡是通过 addEventListener(...arg) 的第三个参数的 capture来指定的。默认为 false,也就是默认冒泡。

1
2
3
4
5
addEventListener(type, listener, {
capture: false,
passive: false,
once: false
})

addEventListener 第三个参数

触发规则

event

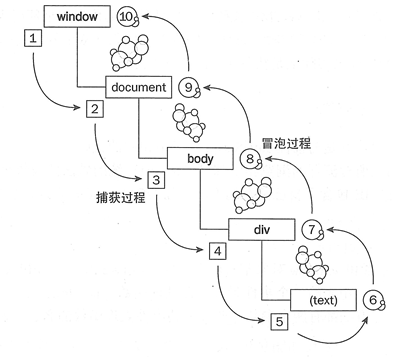
在多个嵌套情况下,捕获的触发是从外到内的,冒泡则相反。先进行捕获,然后是冒泡。

这里要注意一点,在最后的一层中,先触发冒泡或捕获决定于代码中出现的先后,先出现的先执行。

不是所有的事件都能冒泡,例如:blurfocusloadunload

DOM事件流

同时支持两种事件模型:捕获型事件和冒泡型事件,但是,捕获型事件先发生。两种事件流会触及DOM中的所有对象,从document对象开始,也在document对象结束。

DOM事件模型最独特的性质是,文本节点也触发事件

绑定事件方式

在一个支持W3C DOM的浏览器中,像这样一般的绑定事件方式,是采用的事件冒泡方式。

1
2
3
ele.onclick = ()=>{
//doSomething
}

IE浏览器

IE只支持事件冒泡,不支持事件捕获,它也不支持 addEventListener 函数,不会用第三个参数来表示是冒泡还是捕获,它提供了另一个函数 attachEvent

1
2
3
ele.attachEvent("onclick", ()=>{
//doSomething
});

阻止事件传播:

  • 在W3c中,使用 stopPropagation() 方法
  • 在IE下设置 cancelBubble = true
    在捕获的过程中 stopPropagation(); 后,后面的冒泡过程也不会发生了

阻止事件的默认行为

  • 在W3c中,使用 preventDefault(); 方法;
  • 在IE下设置 window.event.returnValue = false;

评论和共享

首先搭建一个express的项目

添加一个index.html


1
2
3
4
5
6
7
8
9
10
11
12
13
14
15
16
17
18
19
20
21
22
<!doctype html>
<html>
<head>
<title>Socket.IO chat</title>
<style>
* { margin: 0; padding: 0; box-sizing: border-box; }
body { font: 13px Helvetica, Arial; }
form { background: #000; padding: 3px; position: fixed; bottom: 0; width: 100%; }
form input { border: 0; padding: 10px; width: 90%; margin-right: .5%; }
form button { width: 9%; background: rgb(130, 224, 255); border: none; padding: 10px; }
#messages { list-style-type: none; margin: 0; padding: 0; }
#messages li { padding: 5px 10px; }
#messages li:nth-child(odd) { background: #eee; }
</style>
</head>
<body>
<ul id="messages"></ul>
<form action="">
<input id="m" autocomplete="off" /><button>Send</button>
</form>
</body>
</html>

安装socket.io插件


1
npm install --save socket.io

在index.js 中添加代码


1
2
3
4
5
6
7
8
9
10
11
12
13
14
15
var app = require('express')();
var http = require('http').Server(app);
var io = require('socket.io')(http);

app.get('/', function(req, res){
res.sendfile('index.html');
});

io.on('connection', function(socket){
console.log('a user connected');
});

http.listen(3000, function(){
console.log('listening on *:3000');
});

在index.html中添加代码


1
2
3
4
<script src="/socket.io/socket.io.js"></script>
<script>
var socket = io();
</script>

这样就能看到用户链接信息了

将index.js改成


1
2
3
4
5
6
io.on('connection', function(socket){
console.log('a user connected');
socket.on('disconnect', function(){
console.log('user disconnected');
});
});

这样就能看到用户退出信息了

在index.html中添加代码


1
2
3
4
5
6
7
8
9
10
<script src="/socket.io/socket.io.js"></script>
<script src="http://code.jquery.com/jquery-1.11.1.js"></script>
<script>
var socket = io();
$('form').submit(function(){
socket.emit('chat message', $('#m').val());
$('#m').val('');
return false;
});
</script>

1
2
3
4
5
6
io.on('connection', function(socket){
socket.on('chat message', function(msg){
console.log('message: ' + msg);
});
//服务器打印消息
});

完成发送给服务器数据

在index.html中添加代码


1
2
3
4
5
6
7
8
9
10
11
<script>
var socket = io();
$('form').submit(function(){
socket.emit('chat message', $('#m').val());
$('#m').val('');
return false;
});
socket.on('chat message', function(msg){
$('#messages').append($('<li>').text(msg));
});
</script>

1
2
3
4
5
io.on('connection', function(socket){
socket.on('chat message', function(msg){
io.emit('chat message', msg);
});
});

完成服务器给前端返回数据

评论和共享

作者的图片

Archie Shi

Nothing to say


Front-End Development Engineer